Posted on

Beetroot Hummus – Best Hummus Recipe

How-to-make-beetroot-hummus-spoonful-stories

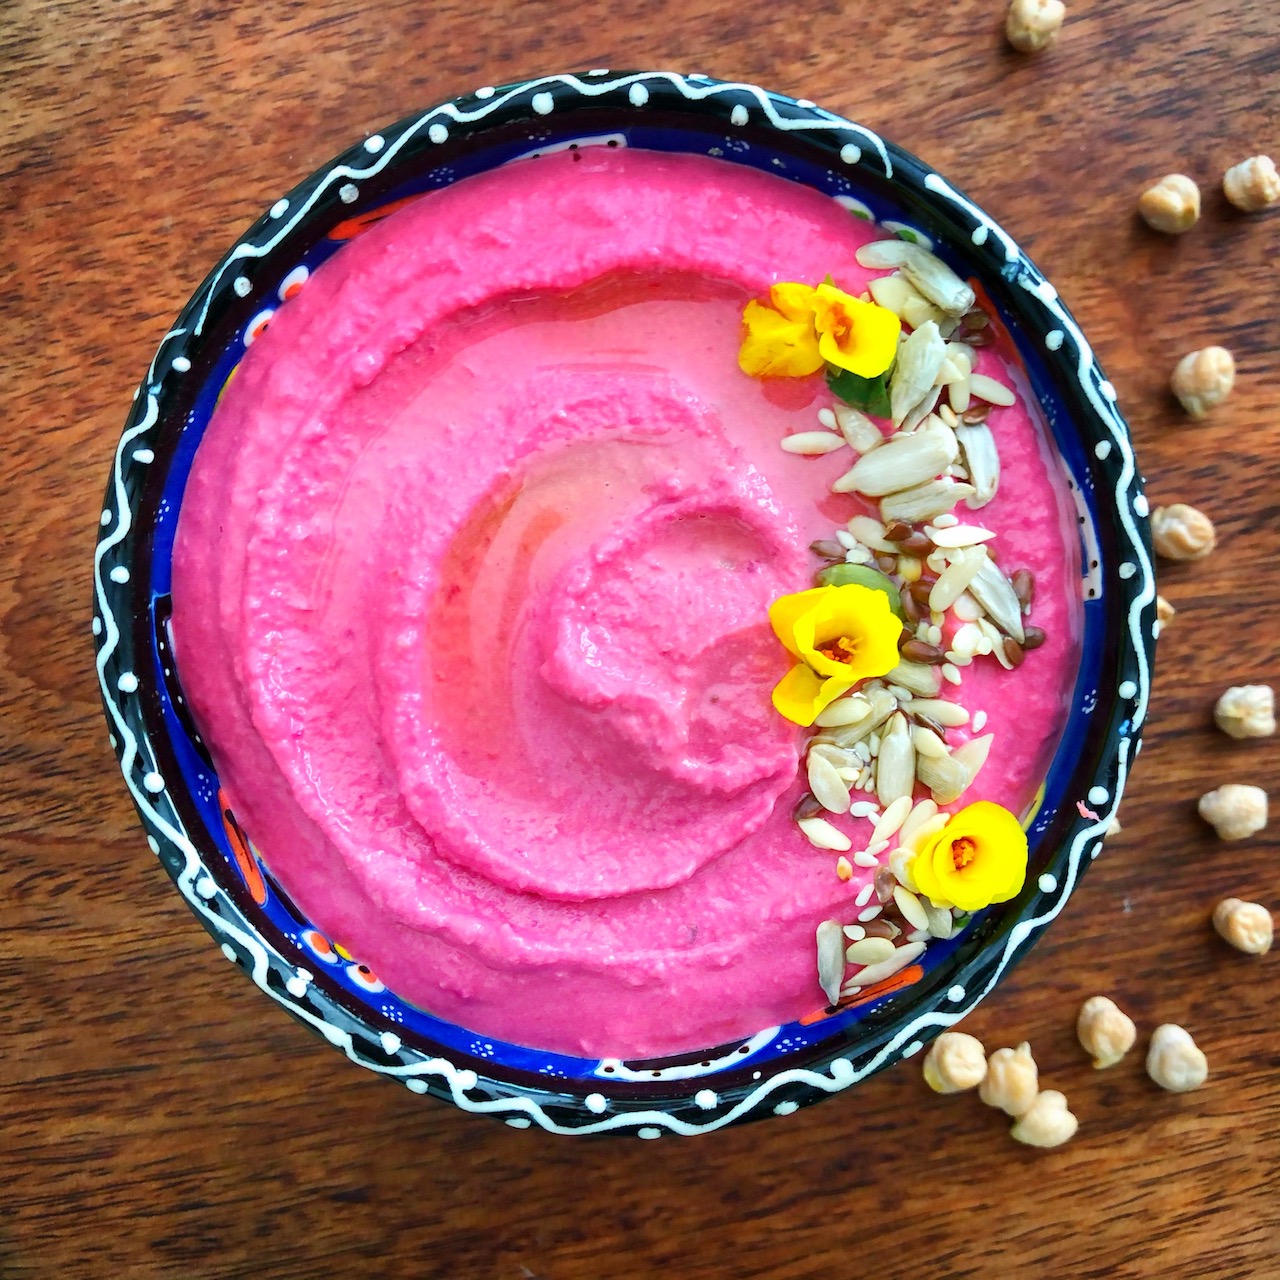
Hot pink, lemony with a kick of garlic, loaded with vitamins and minerals, super creamy and flavourful, and perfect with pita or veggies as a spread! This Vegan Beetroot Hummus is the best hummus recipe and makes for the perfect evening snack! 

It’s easy to make, beautiful to look at and full of nutritional value! 

Once you’re beets and chickpeas are cooked, it’s simply a matter of throwing everything into the blender or food processor and whisking it away. It’s the perfect make ahead hummus recipe, you can store it in the fridge for up to a week. 

I was slightly afraid before taking my first bite as i thought the beets would overpower the taste of the hummus or altogether it might not taste great. But it was amazingly delicious! The lemon, garlic and tahini helped to balance the taste of the beets and gave it a creamy texture making it the best hummus recipe!

It wasn’t just me who liked it, even my father was all for it which is a major factor for me! Honestly, my dad’s feedback is the most important for me when I cook. We had the Beetroot Hummus with chips and veggies. 

Ingredients for Hummus

Ingredients-beetroot-hummus-spoonful-stories

All that you need for this easy hummus recipe is cooked and peeled chickpeas, boiled / baked and peeled beetroots, tahini, garlic cloves, lemon juice, olive oil and cumin powder. I’m sure most of you have these ingredients stocked up in your pantry. With such few and easily available ingredients this recipe makes for a great dip if you have guests coming in 

It’s pretty to look at and amazingly delicious. It will make your tabletop vibrant and will leave you wanting for more. Serve with pita, chips or veggies and make it a party snack or a side dish that your guests will truly love.

You will truly love this Beetroot Hummus because its:

recipe-beetroot-hummus-spoonful-stories
  • Vegan
  • Gluten free
  • Low fat
  • Nutritious 
  • Silky
  • Rich
  • Super delicious 
  • Beautiful to look at

The secret to a smooth and creamy hummus

  • Ice cold water – I don’t have scientific reason behind this, but every time I have mixed tahini with ice cold water it gives the hummus a smooth, creamy and velvety texture. It also seems to make my hummus light and fluffy. The water turns the hummus into a smooth and fluffy dip!
  • Peel the chickpeas – Another trick for the smoothest hummus is to peel the chickpeas and remove the skin of each grain. I know it’s time consuming and requires patience but it’s all worth it! Skinless chickpeas will definitely give a creamy and smooth texture to the hummus.
  • Soak the garlic in lemon juice – If using raw garlic, smash it up and soak it in lemon juice for a few minutes. The acidity of the lemon juice will remove the heat and bitterness of the garlic, leaving behind nothing but sweet garlicky flavour. 
  • Tahini – The best hummus needs to have a decent amount of good quality tahini. Not just a tablespoon or two but a good amount. Using good quality tahini rather than a cheap supermarket one will make a huge difference to the way your hummus will taste. 

Pair this hummus with the Lemon Herb Grilled Chicken Salad to make it a complete healthy meal!

Beetroot Hummus – Best Hummus Recipe

Recipe by Ishana PassiCourse: Side Dish, VeganDifficulty: Easy
Servings

6

servings
Prep time

30

minutes
Cooking time

40

minutes
Total time

1

hour 

10

minutes

Ingredients

  • 3 cups cooked and peeled chickpeas

  • 300 gm beetroot

  • 4 tbsp lemon juice

  • 1 tsp cumin powder

  • 1/4 tsp salt

  • 1/4 cup tahini

  • 1 tbsp olive oil

  • 3/4 cup ice cold water

  • fresh parsley for garnishing

  • 3 cloves minced garlic

Directions

  • Boil the beetroot until fully cooked. Once cool, peel of the skin and chop into large chunks. Soak the minced garlic in the lemon juice and set aside.
  • Pour tahini and ice cold water to the bottom of the blender and then the rest of ingredients. Blend well until smooth.
  • If the hummus is too thick drizzle more water or olive oil.
  • Garnish with parsley leaves or sesame seeds. Serve with pita, veggies or chips.
Posted on

Chicken Bao Buns

Crsipy-Chicken-Bao-Recipe-Spoonful-Stories

Soft and fluffy, sweet and spicy, succulent and crunchy! These steamed mini Chicken Bao Buns are perfect for a fancy dinner party! Craving pan asian? This recipe is the answer for all your pan asian cravings!

Studying in London for the past two years my favourite go to restaurant has always been Ping Pong at Carnaby Street. Whenever I’d go there I always had to order the Crispy Duck Bao. It has always been my favourite dish! This dish is inspired by the Crispy Duck Baos at Ping Pong London! During the lockdown period last month I was craving the baos so badly and decided to recreate the dish with my own little twist. 

Chicken Baos are amazingly delicious and even easier to make. But let me warn you, they do take a bit of time. But it’s definitely worth the wait! Other than the proving time for the dough there’s not much waiting. 

In this recipe, the crispy chicken helps to create tasty sliders and the steamed bao buns gives it a soft and fluffy bite with contrast to the crispy cucumber and chicken. 

Dough

Chicken-Bao-dough-recipe-Spoonful-stories

The buns are soft, fluffy and light! All that is required is flour, milk, butter, water, sugar, salt and yeast! Yes it’s that simple, but you just need to be patient for the dough to prove. The dough requires 90 – 120 minutes to prove. 

Knead the dough with all the ingredients mentioned for the dough and place it in a large bowl. Cover it and set aside in a warm dry place for 90 – 120 minutes. When the dough is double the size of what it was, knead it again and roll into small balls. With the help of a rolling pin, roll each ball into mini ovals and brush with olive oil. Fold the dough over using a straw or a chopstick in between to leave a little space in the middle. Place them on a baking tray and allow them to rest for 45-60 minutes. 

Bao-buns-dough-fold-spoonful-stories

Sauce for Chicken Bao Buns

The sauce for the chicken is quick and tasty. It is simply a mixture of sesame oil, honey, brown sugar, sriracha, ginger garlic paste, paprika, salt, soya sauce and vegetable oil. Simply in a hot pan mix all these ingredients and bring it to a boil. Once the sauce is ready and the chicken is cooked, coat the chicken in the sauce. 

Crsipy-chicken-bao-sauce-spoonful-stories

Before you make the sauce it is important to marinate the chicken for minimum an hour as this will enhance the flavour of the chicken. 

Also, marinating the chicken in buttermilk will make the chicken bao extra crispy! So don’t miss this essential step.

Want to make this a healthy meal? Pair it up with the Asian Kale Salad and have a healthy pan asian meal.

The bao bun recipe is any pan asian foodie lovers favourite recipe, make sure to try this. If you have any suggestions  or queries please do drop them below in the comments sections. 

Chicken Bao Buns

Recipe by Ishana PassiCourse: Non-Vegetarian, Side DishDifficulty: Medium
Servings

15

servings
Prep time

3

hours 
Cooking time

30

minutes
Total time

3

hours 

30

minutes

Soft and fluffy, sweet and spicy, succulent and crunchy! These steamed mini Chicken Baos are perfect for a fancy dinner party!

Ingredients

  • Bao Buns
  • 400 gm flour

  • 2 tbsp sugar

  • pinch of salt

  • 2 tsp instant dried yeast

  • 3 tbsp softened butter

  • 3 tbsp milk

  • 200 ml warm water

  • Chicken Marinade
  • 2 tbsp buttermilk

  • pinch of salt

  • pinch of pepper

  • 1/4 tsp garlic powder

  • 4 chicken breasts cut into bite size

  • Crispy Coating
  • 1/2 cup flour

  • 1 tsp salt

  • 1 tsp black pepper

  • 1/2 tsp garlic powder

  • 1 tsp dried thyme

  • 1 tsp baking powder

  • 1 tsp paprika

  • 1 tsp chilli flakes

  • vegetable oil for deep frying

  • Sweet and Spicy Sauce
  • 2 tbsp honey

  • 4 tbsp brown sugar

  • 1 tbsp vegetable oil

  • 1 tbsp sesame oil

  • 2 tsp ginger garlic paste

  • 3 tbsp soya sauce

  • 2 tbsp sriracha

  • To Garnish
  • 1 onion finely sliced

  • 1/2 cucumber finely sliced

  • 1 tsp chopped coriander

Directions

  • For the bao buns, place sugar, salt, yeast in a large bowl. In a jug warm the milk, water and butter. Stir the butter mixture in the flour with a spoon and then with your hands. Knead the dough for 10 minutes on a floured surface.
  • Transfer the dough into a large oiled bowl. Cover with clingfilm and set aside in a warm dry place for 90 – 120 minutes.
  • Place the chicken in a bowl for marination, add all the ingredients for the marinade. Mix well and place in the fridge for 1 hour.
  • After the dough has proved and is double in size, knead it for 5 minutes on a floured surface. Divide the dough into 15 balls. On a floured surface roll each ball into an oval using a rolling pin.
  • Dab the ovals with olive oil and fold over into half, using a straw or chopstick to leave space in between. Place the buns on parchment paper on a baking tray. Cover with clingfilm and allow it to rest for 45 – 60 minutes.
  • In the meantime for the fried chicken, heat the oil in a large wok or your deep fryer. Mix the crispy coating ingredients together in a bowl and take the chicken out of the fridge. Take one piece of a chicken at a time and coat the chicken in the crispy coating mixture. Make sure it fully coated and place on a plate. Repeat this with all the pieces.
  • Once oil is hot, add in 8-10 pieces of chicken depending on the size of your pan. Cook until golden brown and fully cooked. Keep aside.
  • For the buns, put a large steamer on and in batches place the buns in the steamer. I use a double layer steam, placing 4 buns in each layer. Steam them for 10-12 minutes.
  • In the meantime for the sauce, in a hot pan add all the ingredients for the sauce and bring to boil. Allow it to simmer for 5 minutes until thick. Place the cooked chicken in the sauce and toss together nicely.
  • You can leave the chicken chunks whole or slice them. Carefully open the buns and stuff them with the chicken. Garnish with cucumber, onions and coriander leaves and serve hot.
Posted on

Homemade Cheesy Garlic Bread (No Yeast)

How-to-make-no-yeast-stuffed-cheese-garlic-bread-spoonful-stories

Who wasn’t craving junk food during the lockdown, especially Dominos! So why not make the Homemade Cheesy Garlic Bread (No Yeast)!

Garlic bread is everyones favourite side dish or appetiser at an Italian restaurant. One of the most popular dishes on Dominos menu is their stuffed garlic bread.

I decided to recreate the homemade cheesy garlic bread (no yeast) at home to fulfil my cravings. 

During the lockdown I had my pantry fully stocked, the only thing missing was yeast. But don’t worry, you can use the staples available in your pantry and make a no yeast bread

This homemade cheesy garlic bread (no yeast) is super quick to prepare and the perfect comfort food on a dull day. With a mixture of Italian herbs and pockets of melted cheese, this garlic bread is a wonderful Italian side dish or an evening snack. This recipe is a winner – even the little kids will love it! 

But can bread actually be made without yeast?

Yes, it’s absolutely possible!

The no yeast homemade garlic bread is a dish that can be made last minute if you have guests coming over or if you are in the mood to indulge. The ingredients included for this no yeast cheesy garlic bread recipe are all purpose flour, curd, baking soda, baking powder, sugar, milk and oil. The recipe only requires the everyday staples that are easily available in your pantry. 

The mixture of curd, baking powder and baking soda work as the substitute for yeast. 

I am not a fan of baking with yeast as it requires a lot of patience for the dough to rise. This no yeast bread doesn’t require much kneading which saves a lot of time. 

How to make the dough for homemade cheesy garlic bread?

How-to-make-no-yeast-homemade-cheesy-garlic-bread-dough-mixture-recipe

In a large bowl mix the flour, salt, sugar, baking powder, baking soda, milk, oil and curd. Make sure to use thick curd. Mix it all together until a soft dough is formed. Knead the dough for 8-10 minutes. Cover the dough and leave it to rest for 45 minutes – 1 hour. 

If you wish, this cheesy garlic bread can also be made instantly. There is no need to rest the dough if you are in a rush. 

How-to-make-homemade-cheesy-garlic-bread-dough-recipe

Stuffing for the garlic bread

The filling is super easy and a variety of vegetables can be used. I personally like to have my garlic bread with only a cheese stuffing, making it an extra cheesy garlic bread. 

The filling can be made using sweet corn, mixture of red, yellow and green bell peppers, mixed Italian herbs, grated mozzarella and cheddar. The stuffing can be made according to your taste buds. We will also spread  a garlic and butter mixture on the base of the dough before filling in the stuffing. This would enhance the flavour of the bread. 

How-to-make-no-yeast-homemade-cheesy-garlic-bread-stuffing-recipe

Roll out the dough flat and spread the garlic and butter mixture. Then add the grated mozzarella, cheddar, sweet corn, bell peppers, etc. Use any filling of your choice. Sprinkle some mixed Italian herbs on top and apply oil on the sides of the dough. Now fold this dough into half and seal the edges by pressing both the edges together. 

How-to-make-no-yeast-homemade-cheesy-garlic-bread

Apply the rest of the garlic and butter mixture on top of the folded dough and sprinkle mixed Italian herbs. Make a few vertical cuts on the dough. This would make it easier for you to slice the bread later on. Make sure the cuts are not too deep. 

Transfer the bread on a greased tray. Bake for 20-25 minutes in a preheated oven at 180 celsius. 

Hope this recipe brings joy to your table and don’t keep this recipe to yourself! 

Homemade Cheesy Garlic Bread (No Yeast)

Recipe by Ishana PassiCourse: Vegetarian, VegetarianDifficulty: Medium
Servings

4

servings
Prep time

45

minutes
Cooking time

25

minutes
Total time

1

hour 

10

minutes

This no yeast homemade garlic bread is super quick to prepare and the perfect comfort food on a dull day.

Ingredients

  • 1 cup all purpose flour

  • Salt per taste

  • 1/2 tsp baking powder

  • 1/4 tsp baking soda

  • 1 tsp castor sugar

  • 1 tsp Italian herbs

  • 1 tbsp thick curd

  • 1/4 cup milk

  • 1 1/2 tbsp refined oil

  • 3 tbsp water

  • FILLING

Directions

  • Mix together all the ingredients in a large bowl. Knead until a dough is formed.
  • Keep kneading for 10 minutes. Dab the dough with oil and cover it and set aside to rest for 45 minutes.
  • In the mean time, grate the Mozarella and chop the vegetables for the filling. Melt the butter and mix in the chopped garlic for later use.
  • Roll the dough flat and apply half of the the garlic butter mixture. Add the Mozarella and vegetable stuffing. Apply oil on edges and fold into half. Press the edges together to properly seal the sides.
  • Apply the remaining butter and garlic mixture on top of the folded dough, sprinkle Italian herbs and transfer to a greased tray.
  • Bake for 25-30 minutes at 180 celsius in a preheated oven.
  • Serve hot with any dip of your choice.

Make sure to try the Lemon Herb Grilled Chicken Salad, which goes along perfect with the garlic bread!

Posted on

Green Pea and Peanut Quinoa

How-to-make-pea-and-peanut-qunioa-spoonful-stories

Ever since I was a baby, I have always been fussy about eating green peas. I only started enjoying green peas when I decided to combine it with quinoa. This green pea and peanut quinoa recipe will be every picky eater’s favourite dish! 

Quick and easy, this dish is flavourful and a bowl of healthy comfort food! This quinoa recipe can be served cold as well as warm. It is more like a green pea salad if served cold. It makes for a delicious and healthy side dish or even a healthy summer dinner recipe that goes with anything. 

Every time I cook with green peas it makes me think of my dad. With him its green peas over any other vegetable! This actually reminds me of Nigella Lawson. She absolutely loves green peas! In Fact most of her renowned savoury recipes are to do with peas. 

The best part about peas is that they are a nutritional powerhouse despite the sweetness they have. This green pea and peanut quinoa recipe is fluffy, tasty and high in protein. Quinoa being complete protein and when peas are paired with it, it’s added protein. Quinoa also provides you with lots of minerals and healthy fats making it an easy healthy recipe.

It not only serves as a great side dish but also perfect to pack as a lunch box! 

Fresh or frozen peas?

As peas are not available all year round, it’s okay to use frozen peas for this recipe. This recipe works great with fresh or frozen peas, use whatever is available. Majority of the time I have made the recipe with frozen peas and the taste is the same. So it doesn’t really make a difference. This is also an added advantage. You can make this dish as a quick fix if you want to put together something at the last minute. 

This green pea and peanut quinoa recipe has an Indian touch to it. It is sautéed in olive oil, curry leaves and black mustard seeds to give it a taste of those flavours. I have adapted this recipe from the famous Indian dish, Poha (flattened rice). Poha is a Western Indian breakfast recipe but its flavours are known all over the country. It has been a tradition in my family since many years to have Poha for breakfast every Sunday morning. 

This recipe is a one pot recipe.

One pot quinoa and fresh peas

Start by boiling the peas in a medium sized pot. Once the peas turn bright green and slightly soft, rinse them under cold water. Keep them aside. Next boil your quinoa in the same put in chicken or vegetable stock. You can also boil it in simple water. When the quinoa is cooked and all the liquid in the pot is absorbed, turn off the heat. Allow the quinoa to rest for 5-8 minutes. 

Fluff the quinoa with a fork and mix it with the peas. 

How-to-make-pea-and-peanut-qunioa-spoonful-stories

Sauté the pea and quinoa mixture in olive oil, mustard seeds and curry leaves. Cook until the quinoa is fragrant and add a handful of peanuts. Serve hot and garnish with chopped parsley if you want. This dish is sure to make you feel happy and satisfied! 

Green Pea and Peanut Quinoa

Recipe by Ishana PassiCourse: Sides, MainDifficulty: Easy
Servings

4

servings
Prep time

10

minutes
Cooking time

25

minutes
Total time

35

minutes

Quick and easy, this dish is flavourful and a bowl of healthy comfort food!

Ingredients

  • 1/2 cup uncooked quinoa

  • 1 cup raw green peas

  • 1 cup vegetable stock

  • 1 tsp black mustard seeds

  • Handful of fresh curry leaves

  • 1 tbsp olive oil

  • Handful of peanuts

Directions

  • In a medium size pot, boil the green peas until bright green and slightly soft. Rinse them under cold water, drain and keep aside.
  • In the same pot, bring to boil the vegetable stock. Add the quinoa, cover and let it cook on low heat. Keep it on low heat until all the liquid is absorbed by the quinoa and is fully cooked. Remove from the heat and allow it to rest for 5 minutes.
  • Fluff the quinoa with a fork and mix it with the green peas.
  • In a medium size pan, heat the olive oil. Add the black mustard seeds and curry leaves. After a few seconds, add the quinoa and peas mixture and the peanuts and sauté for 1-2 minutes. Cook until the quinoa is fragrant.
  • Remove from heat and serve hot.

Make sure to try the Greek Watermelon and Cottage Cheese Salad!