Posted on

Coconut Lime Chicken

Coconut-Lime-Chicken-Spoonful-Stories

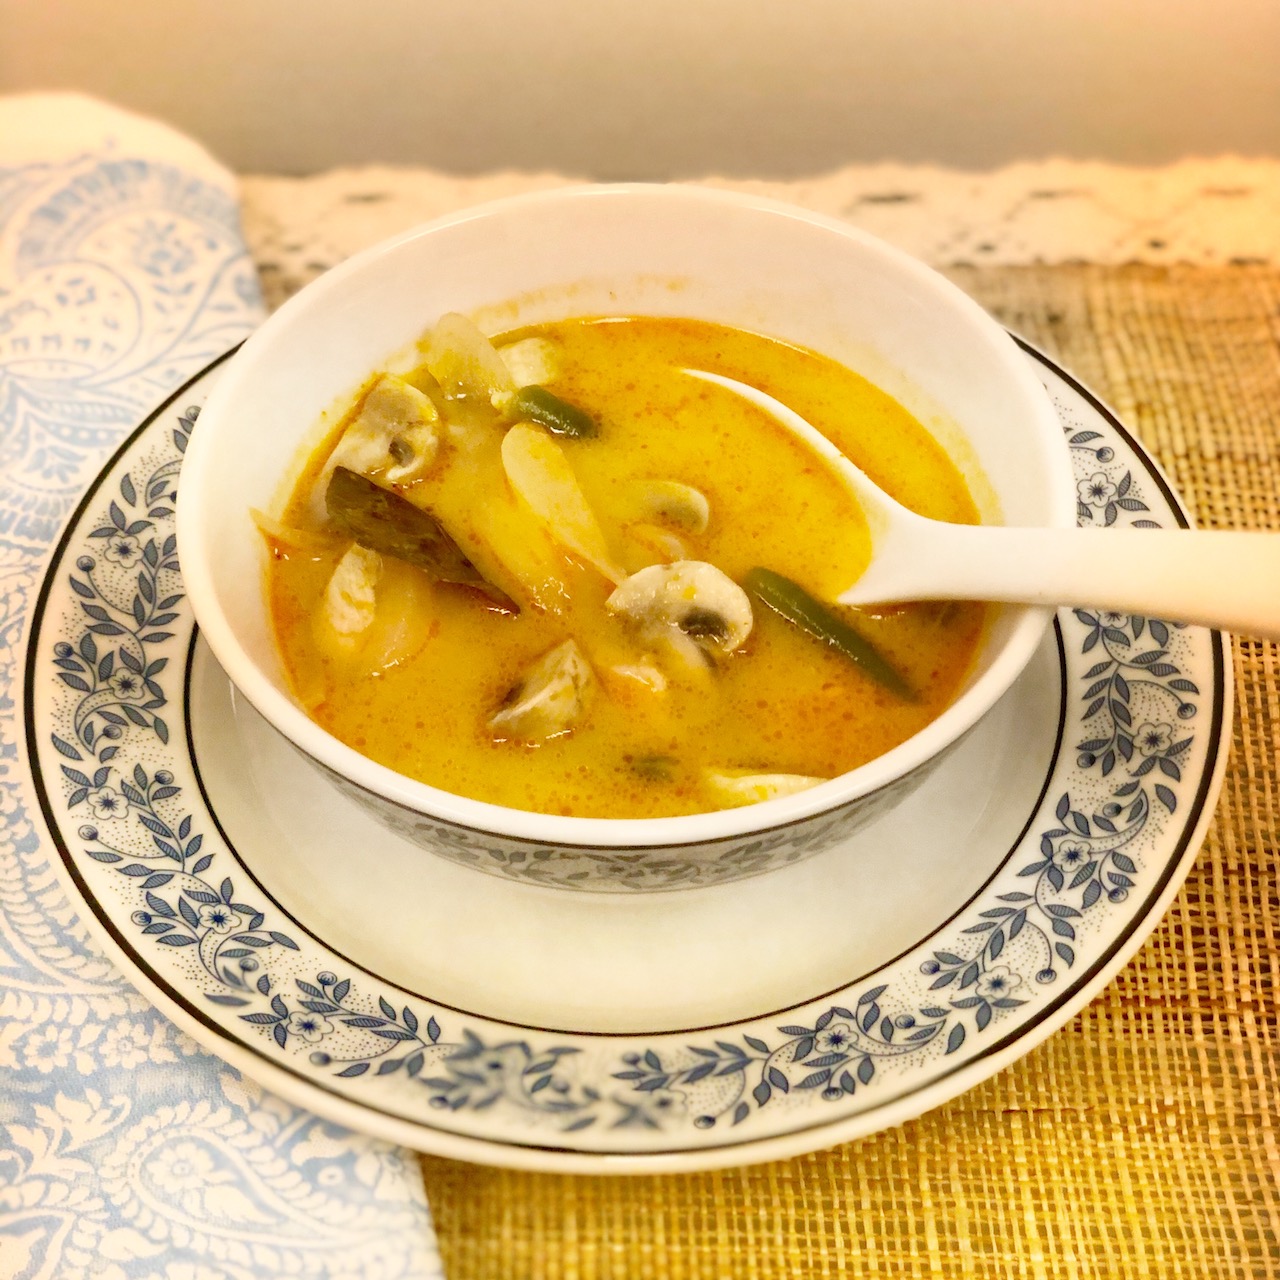
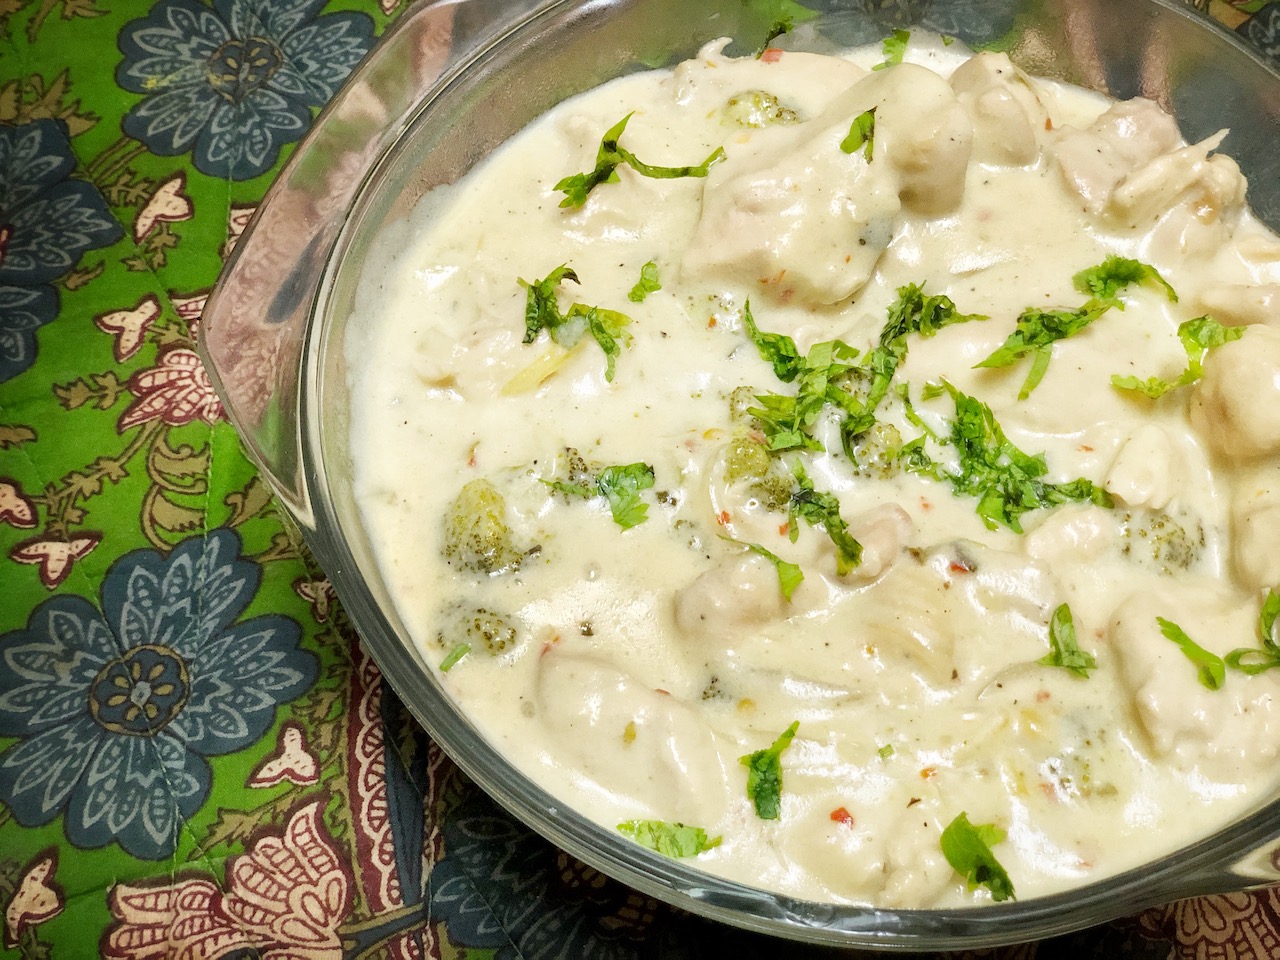
This Thai inspired Coconut Lime Chicken is comforting, delicious and easy to make. It is made with chicken breast that is simmered in creamy coconut milk, fresh lime juice, cilantro and red pepper flakes and ready under 30 minutes!

It’s been awhile since i’ve created a Thai inspired recipe, so I am really excited for this. And I love Thai! I have also been getting quite a few requests for the recipe for this dish so I am eager to see how many of you will make this dish! I had some left over coconut milk, and I decided to make a chicken dish out of it. This recipe is ideal for weeknights or if you have guests coming in last minute. 

The sweetness of the coconut milk combined with the freshness and tanginess of the lemon juice and spiciness of the red pepper flakes is truly one of the best combinations!  This dish is best served steamed rice.

Coconut Milk

Coconut milk is the hero of this Thai inspired creamy Coconut and Lime Chicken dish.  It gives the dish a creamy texture, nuttiness and sweetness. Also, as coconut milk is thick itself, you do not need a thickening agent. 

There are many varieties in the market when it comes to coconut milk. So here are a few tips to help you choose the right one.

Unsweetened – Make sure to buy unsweetened coconut milk. Coconut milk itself is on the sweeter side, whereas sweetened coconut milk and cream of coconut both contain added sugar and are often placed near the coconut milk in shops. 

Canned – Many varieties are available like I said. Canned, boxed, powder or refrigerated. Make sure to buy the canned coconut milk, this usually placed near the Asian sauces. Canned coconut milk is the most flavourful.

Full Fat Milk – For the best taste and texture use full fat coconut milk. Lite coconut milk obviously has less fat, but then tends to  be watery. This will not give you a rich and creamy texture.

Shake the can – It’s important you shake the can before opening it, because there is often a white solid layer on top that is formed which is known as coconut cream. Vigorously shake it before opening to combine the cream and liquid together. 

My favourite brand to use is Chaokoh Coconut Milk. It is easily available in most of the grocery stores. It truly tastes and looks the best, the perfect texture you would want for your Coconut and Lime Chicken. The other brand that you can also use is Real Thai Coconut Milk. This is equally good. 

Recipe tips and notes for Coconut Lime Chicken

  • Like the spice? If you like your food spicy, try adding in a few chopped Thai Chilli Pepper.
  • Fish Sauce – Try adding in a tsp of fish sauce to enhance the flavour of the dish. It is completely optional but it will give the dish a more authentic Thai flavour. I haven’t included it in the recipe since many people don’t stock up on fish sauce. Fish sauce and even Lemongrass would be a great addition to the dish.
  • Lite Coconut Milk – Feel free to use lite coconut milk, but keep in mind the dish won’t be as rich and creamy as it would be if you use full fat milk. The sauce will definitely be thinner. 
  • Don’t like cilantro? If you are one of those people who don’t fancy cilantro, then leave it out! Instead you can use basil or lime leaves. 

Want to try more Thai inspired recipes?

Coconut Lime Chicken

Recipe by Ishana PassiCourse: Main Dish, Non-VegetarianCuisine: ThaiDifficulty: Medium
Servings

4

servings
Prep time

15

minutes
Cooking time

30

minutes
Total time

45

minutes

This Thai inspired Coconut Lime Chicken is comforting, delicious and easy to make.

Ingredients

  • 500 gm boneless, skinless chicken breast

  • 2 tbsp olive oil

  • 1 tbsp butter

  • 1 onion, sliced

  • 1/2 cup chicken stock

  • 1 can full fat, unsweetened coconut milk

  • 2 tbsp lemon juice

  • zest of 1 lemon

  • 2 tbsp freshly chopped cilantro

  • 1 tbsp red pepper flakes

  • salt and pepper to taste

  • 2 cloves garlic, minced

  • 1 tbsp honey

Directions

  • Slice the chicken into small chunks and season with salt and pepper.
  • Heat a large pan over medium heat. Melt the butter in it with 1 tbsp oil. When hot, add the chicken and cook until golden brown or slightly cooked. Transfer to a plate.
  • In the same pan, add the remaining oil and cook the onions and the garlic until fragrant. About 30-45 seconds.
  • Stir in the chicken stock, lemon juice, lemon zest, red pepper flakes and honey. Simmer on low heat until reduced by half for about 5 minutes. Keep stirring and scrapping the pan from the sides.
  • Stir in the coconut milk and season with salt and pepper. Add the chicken to the pan and cook until chicken is fully cooked.
  • Stir in the cilantro and serve with steamed rice.
Posted on

Easy Chicken Caesar Salad

Easy-Chicken-Caesar-salad-Spoonful-Stories

Easy Chicken Caesar Salad with a low fat and worry free dressing is a juicy and healthy salad. It is simple to toss and delicious to eat when topped with this creamy, low fat and homemade Caesar dressing. 

I recommend, Caesar Salad is a must for everyone to have in their recipe files and this recipe will definitely not disappoint you. It is flavourful and satisfying! Makes for the perfect summer dinner or an evening snack. 

Making this Caesar Salad is extremely easy. It is all about the topping and the creamy, delicious dressing, like it is in most salads. The original Caesar Salad Dressing contains eggs and anchovies, but I am not a fan of either. I prefer not to have these two ingredients in my salad bowl. 

So, I have modified the salad dressing recipe, which is still creamy and delicious without eggs and anchovies. 

What goes in a Caesar Salad? 

There are many variations for this salad, but a classic Caesar Salad contains:

  • Croutons – I make the croutons at home
  • Caesar Salad Dressing – Low fat, creamy and homemade
  • Romaine Lettuce or Iceberg – To enjoy the crunch and juiciness 
  • Parmesan Cheese – For garnishing 

But, another common ingredient that you will find in many restaurants is chicken and egg. These two ingredients definitely add more protein to the salad and at the same time make it even more tempting. I always add chicken to my Caesar Salad but otherwise it’s optional if you would like to add it to your salad bowl. 

How to make homemade croutons?

Hoemmade-Croutons-Spoonful-Stories

Homemade croutons are definitely the best! There are two ways of making them at home, in the air fryer or simply baking them in the oven. 

  • How to make croutons in the air fryer: Remove the crust of the bread (optional) and cut the bread into small cubes. Drizzle with 1-2 tablespoon olive oil, sprinkle with salt and let them cook in the air fryer until golden and crispy. Shaking the tray once in between This will take about 7-10 minutes.
  • How to make croutons in the oven: Remove the crust of the bread (optional) and cut the bread into cubes. Drizzle the bread with 1-2 tablespoon olive oil, salt and bake until golden and crispy. This process shall take 7-10 minutes if it is a sandwich bread. Sourdough will slightly take longer, up to 15 minutes. Shake the tray once in between for the croutons to cook evenly. 

Homemade Caesar Salad Dressing

Now you can say goodbye to bottled Caesar dressing because this homemade, creamy and delicious Caesar dressing is the only way forward! 

The dressing is easy to throw together and requires ingredients that are easily available in anyone’s pantry. It is the perfect blend of so many robust flavours that blend in together perfectly. The best part about this salad dressing is that it is low fat and lesser in calories in comparison to all the other dressings out there in the market. But with this recipe, you will still have a rich and creamy dressing. 

The ingredients needed are low fat mayonnaise, mustard, lemon juice, soy sauce, salt, pepper, olive oil, and finely diced garlic. Yes it is that simple! 

I hope you enjoy this delicious and healthy bowl of Caesar Salad. If you have any suggestion please do leave them in the comments section below. 

Also, if you are a salad person like me, try out the Asian Kale Salad and the Lemon Herb Grilled Chicken Salad. These two salad recipes are easy to toss and taste delicious at the same time!

Easy Chicken Caesar Salad

Recipe by Ishana PassiCourse: Non-Vegetarian, SaladsDifficulty: Easy
Servings

4

servings
Prep time

10

minutes
Cooking time

15

minutes
Total time

25

minutes

Easy Chicken Caesar Salad with a low fat and worry free dressing is a juicy and healthy salad. It is simple to toss and delicious to eat!

Ingredients

  • 1 romaine lettuce

  • 400 gms chicken breast

  • 3-4 slices bread

  • 1/2 cup cherry tomatoes

  • Dressing
  • 2 tbsp lemon juice

  • 2 tbsp olive oil

  • 2 cloves minced garlic

  • 1 spoon soy sauce

  • 2 tbsp low fat mayonnaise

  • 1 tsp mustard

  • salt and pepper to taste

Directions

  • Cut the lettuce into pieces, wash the leaves well and set aside to dry. Cut the cherry tomatoes into half and set aside.
  • Slice the chicken into small pieces and marinate it in thyme, pinch paprika, turmeric and salt, spoon olive oil. Heat a pan to medium heat, add the chicken and cook until golden brown and crispy. Remove from heat and set aside to cool.
  • Cut the bread into slices. Drizzle with olive oil, salt and let them cook in the air fryer for about 7-10 minutes until golden crispy.
  • In a bowl prepare the salad dressing by whisking together all the salad dressing ingredients. Whisk until well combined.
  • In a large bowl place the lettuce, cherry tomatoes, croutons and the sliced chicken and coat with the salad dressing. Mix well and serve.
Posted on

Pesto Chicken Sandwich

Pesto-chicken-sandwich-recipe-spoonful-stories

Pesto Chicken Sandwich are the quickest, tastiest and most heartiest meals you’ll ever have! 

If you have leftover chicken breasts or a jar of pesto then you can easily make these Pesto Chicken Sandwiches. They are easy to make and attractive for a cozy dinner. 

I’m going to keep this article short and sweet because this sandwich speaks for itself. I know it’s an absolute nightmare to shoot sandwiches but this grilled sandwich recipe is worth a try! 

Salty pesto slathered over a toasty multigrain bread and piled high with mozzarella, onions and shredded chicken. All the good things into one delicious sandwich!

This grilled chicken sandwich is one of my favourite weeknight dinners ideas. It is delicious and generously sized. I assure you that no one is leaving the table hungry! And it’s the best way to use leftover pesto and chicken breasts. 

pesto-chicken-stuffing

Pesto Chicken Sandwich Stuffing

For the sandwich filling I have simply used the leftovers from my fridge. I had half a jar of pesto, grilled chicken breasts, onions, and sun dried tomatoes. In a large bowl shred the chicken using a fork and mix it with pesto using a spatula and your filling is ready! 

If you want a slightly creamy texture, mix in some greek yogurt to the pesto chicken mixture and toss it together. If you cannot find greek yogurt or do not want to specially buy one for the sandwiches, substitute it with mayonnaise. 

Other than sun dried tomatoes and onions you can add other vegetables and ingredients too. Pine nuts, green chillies, dried cranberries, arugula, lettuce, baby spinach and freshly cut tomatoes are a few options that can be used. 

Which bread to use? 

I personally prefer using multigrain bread for sandwiches. 

Multigrain bread gives the cheesy and gooey sandwiches a healthy side to them! Multigrain bread is rich and grain studded that can stand up lots of flavour. 

Sourdough is tangy and crusty. It is the ultimate grilled cheese bread for grown ups. But sourdough toasted in olive oil and topped with pesto, grilled chicken, tomatoes and mozzarella is the perfect combination. 

Ciabatta, this Italian white bread is spongy but firm with a forgiving crust. When you’re making a sophisticated, complex, grown up grilled cheese sandwich you need something sturdier than a slice of white bread.  

It is by far one of the easiest preps I’ve ever done. Pair it with the Lemon Herb Grilled Chicken Salad for the perfect weeknight dinner!

Pesto Chicken Sandwich

Recipe by Ishana PassiCourse: Non-Vegetarian, Side DishDifficulty: Easy
Servings

4

servings
Prep time

5

minutes
Cooking time

5

minutes
Total time

10

minutes

Pesto Chicken Sandwich are the quickest, tastiest and most heartiest meals you’ll ever have! 

Ingredients

  • 4 boneless chicken breasts, boiled

  • 3 tbsp pesto

  • 1/4 tsp pepper

  • 1/2 cup shredded mozzarella

  • 8 slices multigrain bread

  • 1 tbsp sun dried tomatoes sliced

  • Butter to spread on the bread

Directions

  • In a large bowl shred the chicken using a fork. Add the pesto and mix well together using a spatula or fork. Spread the butter on all the bread slices on both sides of the bread.
  • Sprinkle mozzarella, pepper and sun dried tomatoes on 4 bread slices. Add the layer of chicken on top and place the remaining 4 buttered bread slices on top.
  • In a flat pan, heat some butter on low heat and toast the sandwiches. Keep turning the sandwiches until browned on both sides. Toast depending on how crispy you want the bread or until the cheese melts.
Posted on

Tom Kha Gai

Tom-Kha-Gai-Soup-Spoonful-stories.

Need a delicious and flavourful soup ready under 30 minutes, then this is the perfect choice for you! It is Rich and creamy, silky and aromatic, tangy and salty. Tom Kha Gai (Thai Coconut Chicken Soup) is a complete meal in itself. It is light but filing at the same time and bursting with fresh flavours! This is the best Tom Kha Gai recipe you’ll come across.

This authentic Thai soup is made with the classic combination of chicken and coconut. It gets its rich flavours from the classic Thai ingredients; galangal, lemongrass, coconut milk, fish sauce, Thai basil, chilli paste and kaffir lime. All these fresh and divine ingredients make the soup smell so heavenly. 

This Thai Coconut Soup is truly comforting and comes together quickly. Obviously if you have it the next day it’s even better. This way the flavours have time to rest and meld within the rich and tangy broth. So don’t think twice before doubling the recipe and saving some for the next day.

Tom Kha Gai is healthy, comforting, creamy, sweet, salty, bright, tangy and aromatic! 

Secret Ingredient for Tom Kha Gai

Want the soup to taste exactly as it would in Thailand? Simply add red curry paste to the soup for an authentic Thai taste. Using this secret ingredient also makes it easier to make this soup on a regular basis. If you are not able to get a hold of the galangal, use ginger instead and substitute lime for kaffir lime leaves. 

Ingredients for Tom Kha Gai

The good thing about this delicious recipe is that all ingredients should be easily available at your grocery store. It doesn’t require too many weird ingredients. 

Coconut milk – The base of the Thai coconut chicken soup is made with coconut milk. This is the ingredient that makes it different from other soups. The coconut milk gives the soup a rich and creamy texture. If coconut milk is not available you can use coconut cream instead. 

Galangal – Galangal is known as Thai ginger. Galangal adds a significant taste to the soup. It is different from ginger, but if galangal isn’t available use ginger instead. Most of the time, vegetable shops don’t have galangal. So this is a hard ingredient to get a hold of! 

Lemongrass  and Kaffir Lime Leaves – These two ingredients add the most flavour to the soup which makes a world of a difference. Make sure you don’t miss them! Lemongrass and Kaffir Lime Leaves are authentic Thai ingredients which should be easily available. 

Vegetables – I have mainly used carrots, beans, mushrooms and onions. Feel free to add your favourite vegetables to add more flavour and texture to the soup. Snow peas and  broccoli are good options too.

Vegetable or Chicken Broth – To balance the creamy texture of the coconut milk in the soup, and to get a soupy consistency it is important to add vegetable or chicken broth. Vegetable and chicken broth are flavourful itself, thus enhancing the flavour of the soup. 

The other ingredients used in the soup are lime juice, fish sauce, light soy sauce, red Thai curry paste and garlic. 

Serve this chicken soup with the Asian Kale Salad or Spicy Thai Peanut Noodles to make it the perfect Thai cuisine meal! 

Tom Kha Gai

Recipe by Ishana PassiCourse: Non-Vegetarian, Side DishCuisine: ThaiDifficulty: Easy
Servings

6

servings
Prep time

5

minutes
Cooking time

35

minutes
Total time

40

minutes

Ingredients

  • 1 tbsp olive oil or coconut oil

  • 1/2 onion sliced

  • 1/2 cup mushroom sliced

  • 2 cloves garlic minced

  • 4 quarter inch slices galangal or ginger

  • 4 cups chicken broth

  • juice of 1 lime or lemon

  • 1 lemongrass stalk, pounded with a knife and cut into 2 inch long pieces

  • 1 tbsp fish sauce or Worcestershire sauce

  • 2 1/2 tsp red Thai curry paste

  • 3-4 kaffir lime leaves

  • salt according to taste

  • 1 spoon sriracha

  • 1/4 cup carrots sliced

  • 1/4 cup green beans sliced

  • 2 tsp light soy sauce

  • fresh cilantro chopped for garnish

  • 1/2 can or 250 ml coconut milk or cream

  • 2 medium chicken breast cut into bite size

Directions

  • In a large pot, heat the olive oil over medium heat and saute the garlic, red Thai curry paste, lemongrass, kaffir lime leaves, galangal, onion, and cook stirring frequently for 5 minutes.
  • Add the chicken broth and bring to a boil. Allow it to simmer for 20 minutes, uncovered.
  • Add in the coconut milk, chicken pieces, mushrooms, beans and carrots. Strain out the galangal, lemongrass, kaffir lime leaves and discard. Simmer until chicken is just cooked through, add the lime juice, soy sauce, sriracha, fish sauce and salt.
  • Allow it to cook for 2-4 minutes. Serve hot and garnish with freshly chopped coriander.
Posted on

Crispy Fried Chicken

Crsipy-Fried-Chicken-Recipe-Spoonful-Stories

Let’s walk through the pleasure of having this juicy, crispy fried chicken. Super crispy fried chicken, made with buttermilk and seasoned flour is crispy on the outside, juicy and tender on the inside. This dish is perfect for picnics, potlucks, and dinner! Who doesn’t love homemade comfort food! 

Crispy Fried Chicken is my go to recipe always. The pleasure of eating this piece of fried chicken is divine.

 Imagine a piece of chicken with a coating full of crunchy ripples. As you bring it closer you can smell the spices – onion, paprika, garlic, thyme, pepper! And once you take a bite, you can hear the crispy coating cracking and one cannot resist the flavourful crust. Your mouth will be exploding with the taste of the herbs, crunch of the crispy coating and the tenderness of the juicy chicken. 

The best part about this fried chicken is that you can make it yourself at home without stopping by at KFC! Simply coat the chicken pieces in buttermilk, beaten eggs and seasoned flour and fry them to perfection. Yes, it’s that simple! All that is needed is flour, egg, buttermilk, spices of your choice and oil for frying. You can now make this juicy, tender and crispy fried chicken all by yourself!

Tips for making Crispy Fried Chicken

Dry brine the chicken – Salting the chicken means to dry brine it first. Do this step over night in the fridge or simply 30 minutes before coating and frying the chicken. This step is essential as salting is critical for moist and flavourful chicken.It gives the chicken direct contact with the salt which helps to tenderise it and make it flavourful.  

Strong spice mixture – Mix the seasoning blend while the chicken is being salted. Don’t be scared to over do it with the spice mixture as the fat from frying is going to mellow down the spice flavour and most of it will be left behind in the coating process. You can also make the seasoned flour spice mixture and store it in airtight container for future use. 

Use egg whites, alcohol and cornstarch

1. Egg whites add structure to the batter. It helps the flour coating stick to the chicken better. If you use full eggs, the fat content of the yolk will make the crispy coating soft. 

2. Alcohol helps to create flakey layers and a crispy coating. Simply add it to the batter and it will evaporate when frying the chicken pieces in oil. Thus, you are not consuming it, you’re just simply using it to create layers and crispy crust.

3. Cornstarch is another secret ingredient that can be added to the batter. Cornstarch in the flour makes the crust crispier. 

How to serve Crispy Fried Chicken

After frying the chicken pieces, move them onto a cooling rack which is set over a lined paper towel tray. Try to avoid resting the chicken directly on the paper towel or brown paper. This definitely soaks in the excess oil, but at the same time creates steamy spots that that crispy coating gets soggy. 

Let the chicken rest and cool for at least 10 minutes before serving. This will ensure that the crust is properly set and that the excess grease is soaked. 

Serve this fried chicken recipe with Sun Dried Tomato Spaghetti and enjoy a cozy meal with your loved ones over the weekend! 

Crispy Fried Chicken

Recipe by Ishana PassiCourse: Main Dish, Non-VegetarianDifficulty: Medium
Servings

6

servings
Prep time

45

minutes
Cooking time

20

minutes
Total time

1

hour 

10

minutes

Super crispy fried chicken, made with buttermilk and seasoned flour is crispy on the outside, juicy and tender on the inside

Ingredients

  • 2 large egg whites

  • 2 cups buttermilk

  • 1 tbsp vodka

  • oil for deep frying

  • 1 tbsp cornstarch

  • 2 cups flour

  • 1 tsp oregano

  • 1 tsp dried thyme

  • 1/2 tbsp freshly ground black pepper

  • 1 tbsp garlic powder

  • 1 tbsp ginger powder

  • 1 tbsp onion powder

  • 2 tbsp paprika

  • 2 tbsp salt

  • 1/2 tbsp red chilli powder

  • 1/2 tbsp coriander powder

  • 8 pieces bone chicken, 4 thighs and 4 drumsticks

Directions

  • Place the chicken pieces in a tray or plate and drizzle 1 tbsp of salt. Set aside for 30 mins or refridgrate over night.
  • In a large combine all of the spices together.
  • Coat the chicken with half of the seasoning mixture.
  • Add the flour and cornstarch to the spice mixture. Mix together and set aside. In a separate bowl whisk together the buttermilk, egg whites and the alcohol. Place a cooling rack over a lined paper towel tray.
  • One piece at a time, dip the chicken in the buttermilk to fully coat, then place it in the flour and spice mixture. Completely coat the chicken in the flour and repeat this process twice with each piece.
  • Set the chicken aside and start heating the oil for frying. Once the oil is hot enough, place 3 pieces in the oil and fry (depending on the size of the pan). Keep rotating the chicken using tongs every 3-5 minutes.
  • Until golden brown and fully cooked keep frying. It should take about 12-15 minutes per piece.
  • Transfer the chicken onto the prepared cooling rack and allow it to rest for 10 minutes before serving.
Posted on

Chicken Bao Buns

Crsipy-Chicken-Bao-Recipe-Spoonful-Stories

Soft and fluffy, sweet and spicy, succulent and crunchy! These steamed mini Chicken Bao Buns are perfect for a fancy dinner party! Craving pan asian? This recipe is the answer for all your pan asian cravings!

Studying in London for the past two years my favourite go to restaurant has always been Ping Pong at Carnaby Street. Whenever I’d go there I always had to order the Crispy Duck Bao. It has always been my favourite dish! This dish is inspired by the Crispy Duck Baos at Ping Pong London! During the lockdown period last month I was craving the baos so badly and decided to recreate the dish with my own little twist. 

Chicken Baos are amazingly delicious and even easier to make. But let me warn you, they do take a bit of time. But it’s definitely worth the wait! Other than the proving time for the dough there’s not much waiting. 

In this recipe, the crispy chicken helps to create tasty sliders and the steamed bao buns gives it a soft and fluffy bite with contrast to the crispy cucumber and chicken. 

Dough

Chicken-Bao-dough-recipe-Spoonful-stories

The buns are soft, fluffy and light! All that is required is flour, milk, butter, water, sugar, salt and yeast! Yes it’s that simple, but you just need to be patient for the dough to prove. The dough requires 90 – 120 minutes to prove. 

Knead the dough with all the ingredients mentioned for the dough and place it in a large bowl. Cover it and set aside in a warm dry place for 90 – 120 minutes. When the dough is double the size of what it was, knead it again and roll into small balls. With the help of a rolling pin, roll each ball into mini ovals and brush with olive oil. Fold the dough over using a straw or a chopstick in between to leave a little space in the middle. Place them on a baking tray and allow them to rest for 45-60 minutes. 

Bao-buns-dough-fold-spoonful-stories

Sauce for Chicken Bao Buns

The sauce for the chicken is quick and tasty. It is simply a mixture of sesame oil, honey, brown sugar, sriracha, ginger garlic paste, paprika, salt, soya sauce and vegetable oil. Simply in a hot pan mix all these ingredients and bring it to a boil. Once the sauce is ready and the chicken is cooked, coat the chicken in the sauce. 

Crsipy-chicken-bao-sauce-spoonful-stories

Before you make the sauce it is important to marinate the chicken for minimum an hour as this will enhance the flavour of the chicken. 

Also, marinating the chicken in buttermilk will make the chicken bao extra crispy! So don’t miss this essential step.

Want to make this a healthy meal? Pair it up with the Asian Kale Salad and have a healthy pan asian meal.

The bao bun recipe is any pan asian foodie lovers favourite recipe, make sure to try this. If you have any suggestions  or queries please do drop them below in the comments sections. 

Chicken Bao Buns

Recipe by Ishana PassiCourse: Non-Vegetarian, Side DishDifficulty: Medium
Servings

15

servings
Prep time

3

hours 
Cooking time

30

minutes
Total time

3

hours 

30

minutes

Soft and fluffy, sweet and spicy, succulent and crunchy! These steamed mini Chicken Baos are perfect for a fancy dinner party!

Ingredients

  • Bao Buns
  • 400 gm flour

  • 2 tbsp sugar

  • pinch of salt

  • 2 tsp instant dried yeast

  • 3 tbsp softened butter

  • 3 tbsp milk

  • 200 ml warm water

  • Chicken Marinade
  • 2 tbsp buttermilk

  • pinch of salt

  • pinch of pepper

  • 1/4 tsp garlic powder

  • 4 chicken breasts cut into bite size

  • Crispy Coating
  • 1/2 cup flour

  • 1 tsp salt

  • 1 tsp black pepper

  • 1/2 tsp garlic powder

  • 1 tsp dried thyme

  • 1 tsp baking powder

  • 1 tsp paprika

  • 1 tsp chilli flakes

  • vegetable oil for deep frying

  • Sweet and Spicy Sauce
  • 2 tbsp honey

  • 4 tbsp brown sugar

  • 1 tbsp vegetable oil

  • 1 tbsp sesame oil

  • 2 tsp ginger garlic paste

  • 3 tbsp soya sauce

  • 2 tbsp sriracha

  • To Garnish
  • 1 onion finely sliced

  • 1/2 cucumber finely sliced

  • 1 tsp chopped coriander

Directions

  • For the bao buns, place sugar, salt, yeast in a large bowl. In a jug warm the milk, water and butter. Stir the butter mixture in the flour with a spoon and then with your hands. Knead the dough for 10 minutes on a floured surface.
  • Transfer the dough into a large oiled bowl. Cover with clingfilm and set aside in a warm dry place for 90 – 120 minutes.
  • Place the chicken in a bowl for marination, add all the ingredients for the marinade. Mix well and place in the fridge for 1 hour.
  • After the dough has proved and is double in size, knead it for 5 minutes on a floured surface. Divide the dough into 15 balls. On a floured surface roll each ball into an oval using a rolling pin.
  • Dab the ovals with olive oil and fold over into half, using a straw or chopstick to leave space in between. Place the buns on parchment paper on a baking tray. Cover with clingfilm and allow it to rest for 45 – 60 minutes.
  • In the meantime for the fried chicken, heat the oil in a large wok or your deep fryer. Mix the crispy coating ingredients together in a bowl and take the chicken out of the fridge. Take one piece of a chicken at a time and coat the chicken in the crispy coating mixture. Make sure it fully coated and place on a plate. Repeat this with all the pieces.
  • Once oil is hot, add in 8-10 pieces of chicken depending on the size of your pan. Cook until golden brown and fully cooked. Keep aside.
  • For the buns, put a large steamer on and in batches place the buns in the steamer. I use a double layer steam, placing 4 buns in each layer. Steam them for 10-12 minutes.
  • In the meantime for the sauce, in a hot pan add all the ingredients for the sauce and bring to boil. Allow it to simmer for 5 minutes until thick. Place the cooked chicken in the sauce and toss together nicely.
  • You can leave the chicken chunks whole or slice them. Carefully open the buns and stuff them with the chicken. Garnish with cucumber, onions and coriander leaves and serve hot.
Posted on 3 Comments

Lemon Herb Grilled Chicken Salad

Grilled-chicken-salad-recipe-summer-salad-recipe-easy-summer-dinner-recipe-for-familyhealthy-salad-dressing-vinaigrette-arugula-leaves-marinated-grilled-chicken-3

No more dull grilled chicken dinners!

During this summer season, there is something about the heat that has me wanting lighter foods like this Lemon Herb Grilled Chicken Salad. Grilled chicken salads make for a wholesome dinner to share with your loved ones. Summer salad recipes are not only simple to toss but also totally delicious and often a nutritional powerhouse, like this Lemon Herb Grilled Chicken Salad. 

Nothing is more revitalising than a bowl of mixed greens, fresh summer produce and a healthy salad dressing. 

During the summer season, my father and I mostly indulge in refreshing and light salads to beat the heat. These easy summer dinner recipes for family are delicious and healthy salads. They always work when we are back from our workout sessions or simply just enjoying the evening breeze. We like to use fresh vegetables and greens and create a vibrant bowl leaving us satisfied and full. 

How-to-make-grilled-chicken-salad-recipe-spoonful-stories

This recipe provides lots of Vitamin A and folate from the arugula leaves, protein from the grilled chicken and lots of antioxidants from the cucumbers and tomatoes. The tangy honey-mustard vinaigrette is the perfect healthy salad dressing to balance the bitterness of the arugula leaves and the juiciness of the tomatoes. I assure you, put this refreshing summer salad in the centre of the table and it will be finished in no time. The tanginess of the dressing, bitterness of the leaves and the char of the grilled chicken is truly irresistible! If you have been trying to make your dinners healthier then this is the perfect salad to start with. 

This is a fairly simple recipe that only requires one dressing which also acts as a marinade for the grilled chicken

Arugula Leaves Preparation

You should always start by washing the arugula leaves under running water. This dusts off the dust and dirt and immediately resting them in an ice bath for a couple of minutes. The ice bath prevents the leaves from changing its colour and keeps them fresh. 

how to make healthy salad dressing

Honey Mustard Vinaigrette

The honey-mustard vinaigrette requires olive oil, lemon juice, mustard, vinegar, honey, oregano, chilli flakes, chopped garlic and mint leaves. Whisk together all the ingredients and you have your salad dressing ready! Isn’t it super quick and easy? 

Lemon Herb Grilled Chicken Marinade

Now coming to the marinated grilled chicken

A tip, try to marinate and refrigerate the chicken for at least 2 hours. The key to marinating your grilled chicken longer is that the citric acid of the lemon juice will break down the fibres of the meat, tenderise it and at the same time enhance the flavour of the meat! Who doesn’t love a juicy grilled chicken breast?! 

Keep the grilled chicken marinade refrigerated, unless you want some bacteria to accompany your grilled chicken!

How to make the Lemon Herb Grilled Chicken Salad

Lemon Herb Grilled Chicken Salad Recipe 

Recipe by Ishana PassiCourse: Non-Vegetarian, SaladDifficulty: Easy
Servings

4

servings
Prep time

20

minutes
Cooking time

15

minutes
Total time

35

minutes

Ingredients Dressing/marinade

  • 1 tbsp olive oil

  • 2 tbsp vinegar or apple cider vinegar

  • 1 tsp mustard

  • 2 tbsp water

  • juice of 1 lemon

  • zest of 1 lemon

  • 1 tsp freshly chopped coriander

  • 2 tsp honey

  • Rock salt to taste

  • Pepper to taste

  • 2 tsp finely chopped garlic

  • 500 gm boneless, skinless chicken breast

  • SALAD
  • 2 cups arugula leaves – washed and dried ( roughly chopped)

  • 1 large cucumber diced

  • 1 large tomato diced

  • 1 onion finely sliced

  • Rock salt to taste

Directions

  • Whisk together all the ingredients for the dressing in a large bowl. Keep aside half and refrigerate for later to use as the dressing. Pour out the remaining in a shallow dish.
  • Marinade the chicken in the dish for at least 15 minutes (if time allows up to 2 hours in the refrigerator). While the chicken is being marinated, prepare all the salad ingredients and toss together in a large bowl.
  • Let the chicken rest for 3-5 mins, slice and mix with the salad. Drizzle the remaining untouched dressing over the salad and serve!
  • Add a handful of mixed seeds of your choice to add extra crunch!

Notes

  • Keep the marinated chicken refrigerated.

Hi! If you have any questions related to the recipe please leave a comment below. Don’t keep this recipe to yourself and spread the word! Make sure to try the Asian Kale Salad Recipe for some Asian flavours.